Friday, April 29, 2011

Happy Mother’s Day!

Today, I want to share with you my design project for Creative Critterz Imaginations blog.

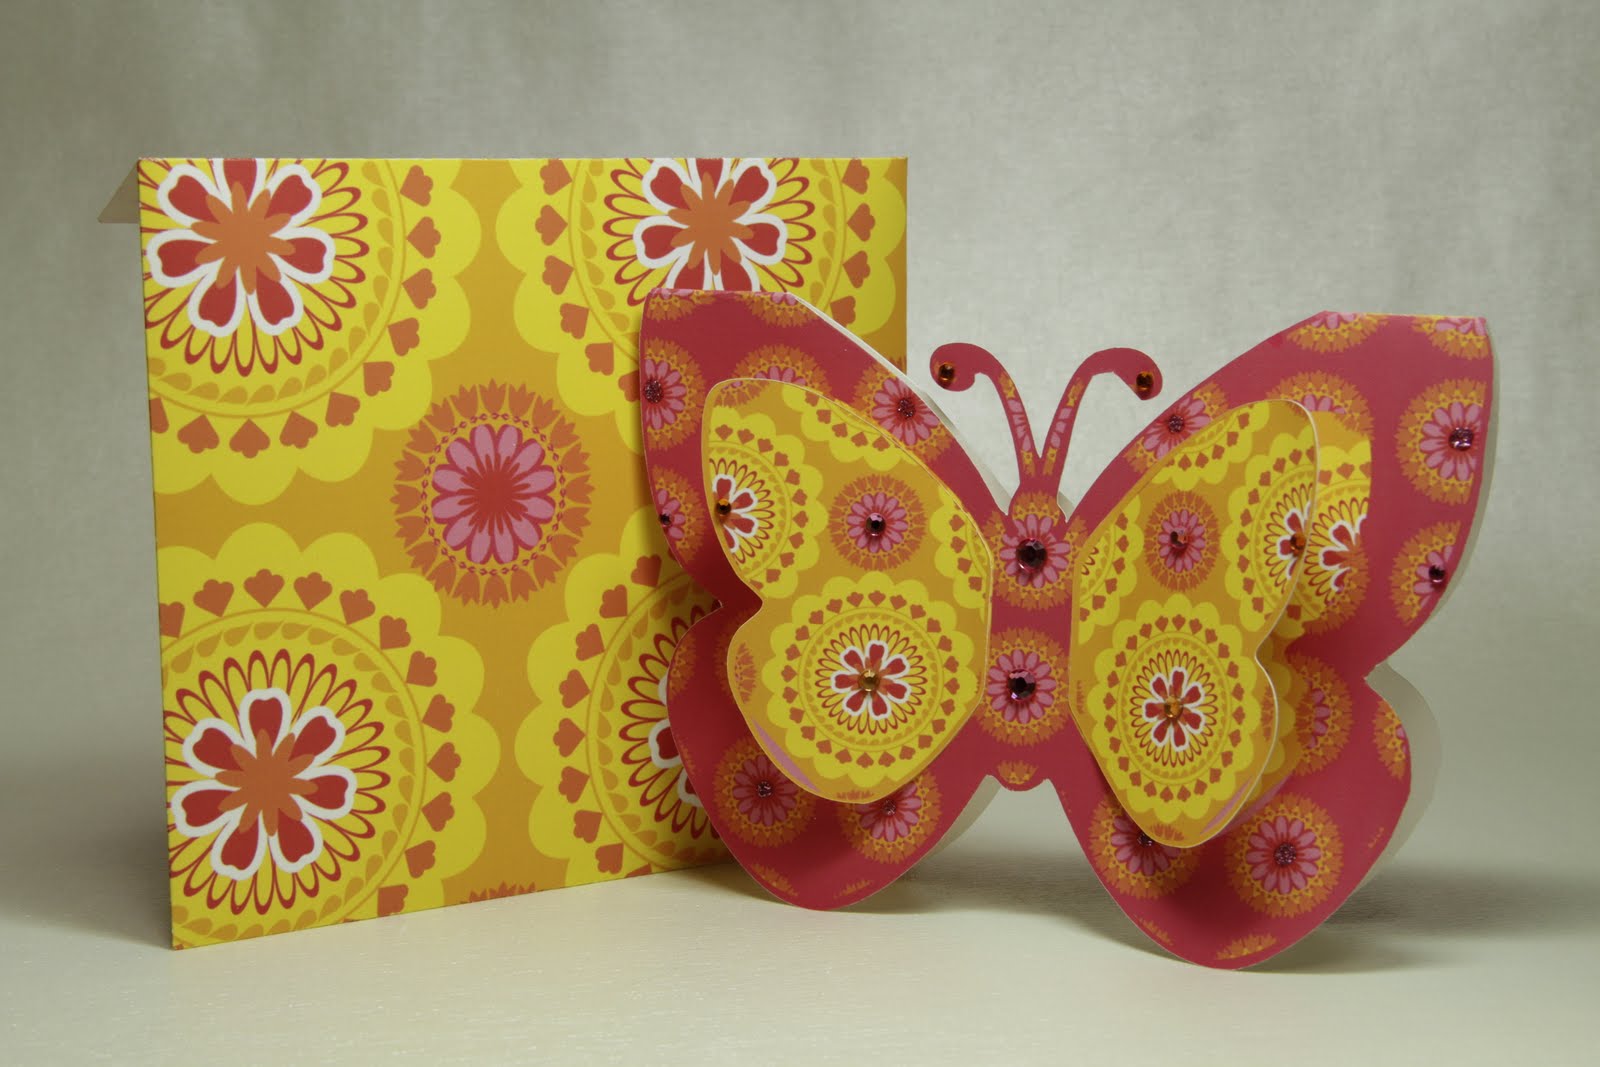
This adorable box would be perfect to hold a pair of earrings for your mother or it could be used to hold a special birthday present. I love how it looks like a card, but is really a box. In fact, you could even use this as a party favor. The All Wrapped Up Cartridge is so versatile!


This image is on page 10 of the manual and all layers are cut at 10.6 inches. I wanted it to look like it was lined, so I printed the card base on yellow paper. The rest of the layers are printed on Epson photographic paper. Super simple!


Here is a side view of the box.


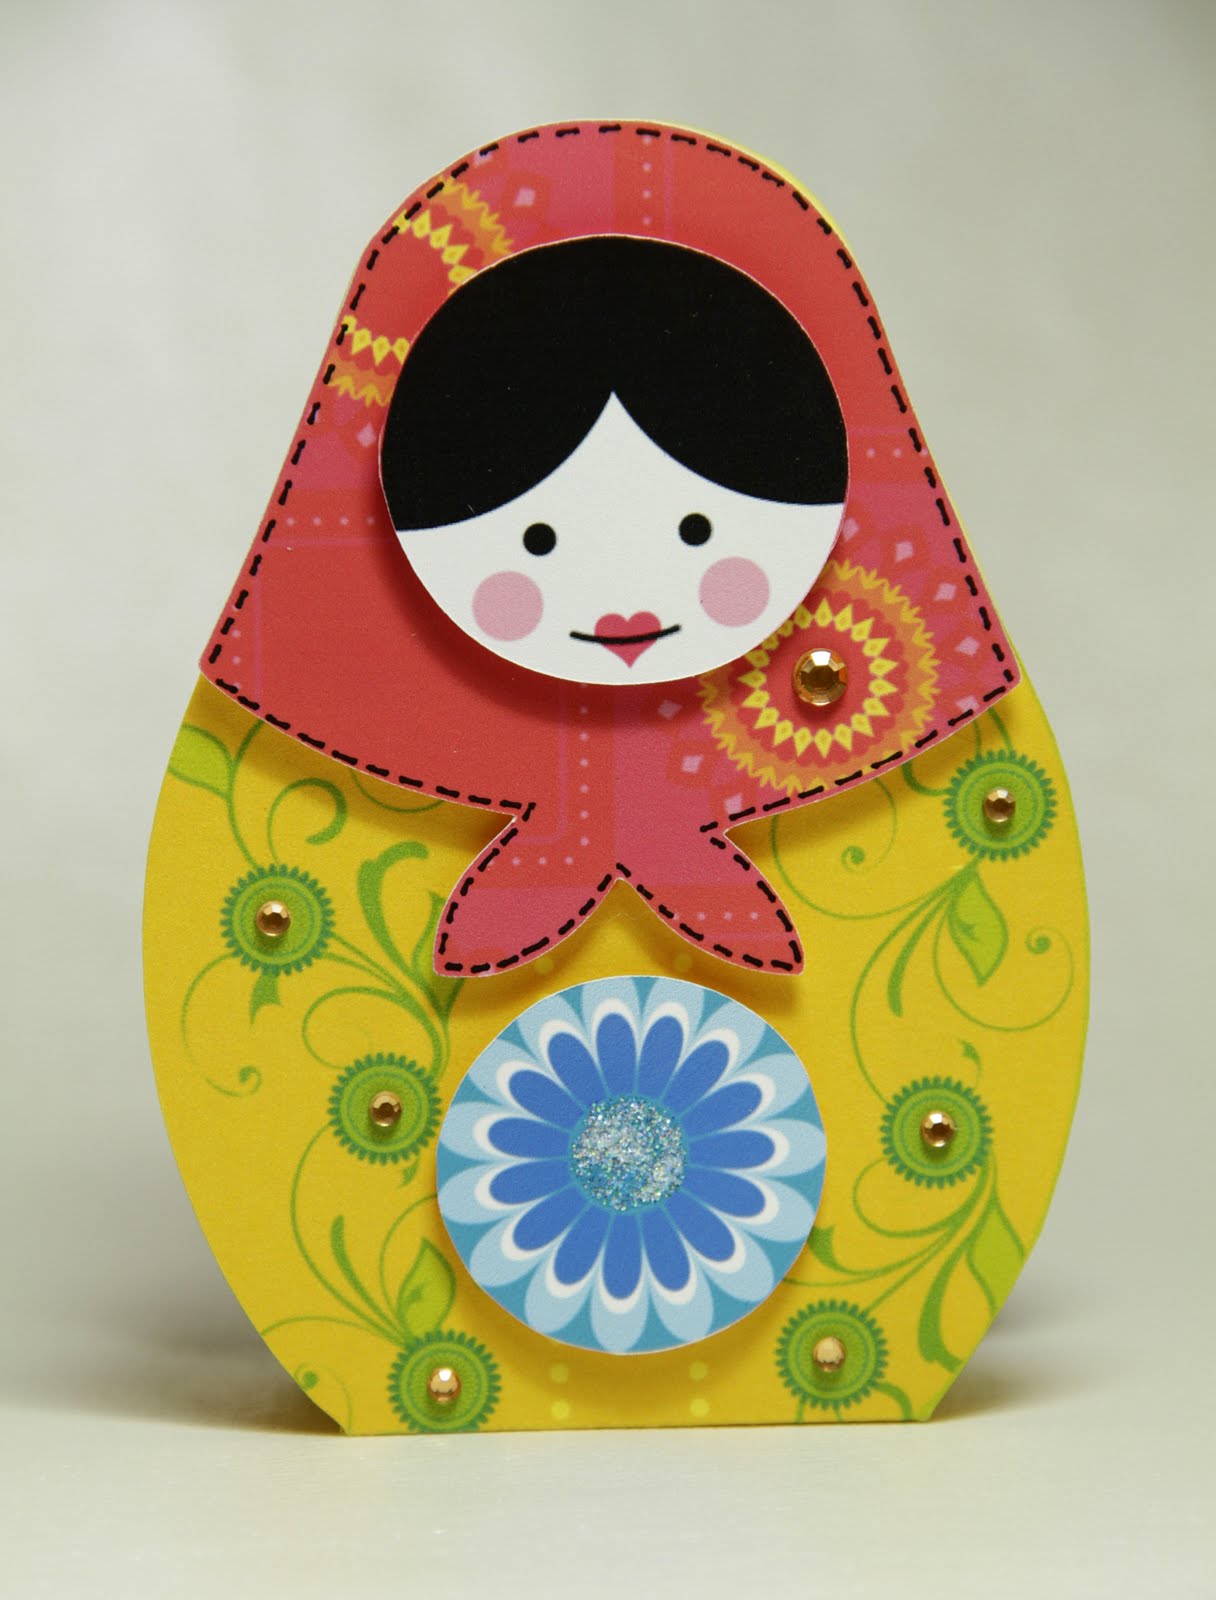
Since there are no tick or fold marks on this cut, here is a quick diagram as to how to fold. I used a ruler and a stylus, but you could also use the Scor-Pal or the Martha Stewart Score Board. I used a black pen to stitch around the top piece, added glitter, rhinestones and then assembled the layers using pop dots. Lastly , I assembled the box using a glue stick.

Recipe:
All Wrapped Up Imagine Cartridge
Adhesive and Dimensionals
Glitter glue
Kaiser rhinestones
Black pen

Thanks for visiting and have a great week.

Thursday, April 28, 2011

Terrifically Talented Thursday

Welcome to Terrifically Talented Thursday. For those of you that are new to this blog, every Thursday, I showcase five blogs, websites or posts that I think you will enjoy. Here are my weekly picks.

Walk in my garden is one of my all-time favorite cartridges and I was so excited to see this adorable wall hanging  made with this cartridge. Melissa, from Melissa’s Scrappen Place used WIMG for all the cuts except the sentiment which is from the wild card cartridge.

Did you buy the new Cricut Expression2? I am excited to announce that I ordered mine and it should be here two days before my birthday! Yahoo happy birthday to me! If you ordered one or would like more information, here is the best tutorial ever! Matt and Christie do an outstanding job explaining all the features. I can’t wait until mine arrives. In the meantime, I am going to watch this video again!

I recently discovered the Scrapbooking Queen and love her blog. I was fortunate to be included in the same blog hop with her. While you are there, be sure to check out her Butterflies and Blogs hop. Gorgeous.

For the cutest Cricut birthday box ever, visit It’s Tori’s Time. Tori is  mega talented and this box is adorable.

I am a big fan of Fantabulous Cricut Challenge blog and am extremely honored and excited to be featured on their blog today! Be sure to check out their amazing blog for all things Cricut!

Thanks for stopping by and I hope you are having a terrific Thursday. Please stop in tomorrow for a fun new project!

Linda

Wednesday, April 27, 2011

Using Word to Add Sentiments to Your Cards

I get a lot of emails asking me how I add sentiments to my Cricut Images so I thought I would do a quick video. I typically use Photoshop to create my sentiments, but today we are going to use Word. I try to match the shape as closely as possible to a Word image. If it is an unusual shape, I try to come as close as possible. Please watch the video for complete details!


I also recently filmed a video on how to make rub-ons and thought I would repost in case you missed it. Both methods work well for adding sentiments!


Thanks for visiting and stay tuned for a fun Terrifically Talented Thursday!

Monday, April 25, 2011

All Wrapped Up!

I hope you all had a wonderful Easter weekend. We are still on a mini vacation and are having a marvelous time.

As you all know, I recently bought the All Wrapped Up Imagine Cartridge and I am in love with the vibrant colors and designs!  

For this cute and easy card, I used the card and all the layers located on page 21 of the handbook. I cut the card at 9 inches. I wanted a 3-D look, so I attached the wings with a little glue stick and bent them. I added rhinestones and was finished! This card is so versatile; you could use it for Easter, Mother’s Day or for a birthday card!
I love the envelopes on this cart! The envelope is on page 21 and flood filled with paper from page 40 to match my card. This cart is now my go to envelope cartridge!

Recipe:
All Wrapped Up Imagine Cartridge
Adhesive and Dimensionals
Rhinestones from my stash

Thanks for visiting! See you soon!

Friday, April 22, 2011

Happy Earth Day and Happy Birthday Gaby Blog Hop

First things first, Happy Birthday Gaby and Happy Earth Day! Welcome to my blog and to Gaby’s Blog Hop. If you want in on the fun and prizes make sure you start with Gaby! If you arrived from Melissa Made you're on the right track.

I love Butterflies and could not think of a better way to celebrate Earth Day and my friend’s birthday than to make a cute butterfly card!


I used the Cricut Florals Embellished cartridge and Design Studio to make this adorable butterfly. The butterfly image is located on page 64 of the manual.

To make the card, I welded two shadow images together. Next I cut all the layers at 3¼ inches. Lots of layers, but super easy to make. First, I attached the black shadow to the base card and then attached the light green piece to the black piece. I attached the remaining layers, added glitter and pop dotted to the black layer. I love how sweet this card is, just like Gaby!!

Your next stop is Abby from Scrapabookaholic by Abby.

Hope you enjoy the hop and have a Happy Easter!

Thursday, April 21, 2011

Terrifically Talented Thursday

Welcome to Terrifically Talented Thursday. For those of you that are new to this blog, every Thursday, I showcase five blogs, websites or posts that I think you will enjoy. Here are my weekly picks.


I love pop-up cards and here is a new twist on pop-up cards called Honey Pops. I love this one by Broni Holcombe. Be sure to check out her blog Splashes of Watercolor and her blog hop which features fun stamps and honey comb paper from Inky Antics. Super cute idea!

Yesterday I posted my video on how to make fabric and tissue tape. I just came across a video from Psychomoms on how to make the Tim Holtz type of tissue tape using first aid paper tape. Clever idea and the tape is only $3.00 a roll. Who knew!

Be sure to check out Paper Craft Planet’s blog to see a set of stamped tea lights and an adorable slide top box designed by Lori Tecler. There is also a free link to the box template. Super cute!

I just placed an order for a set of Spellbinder’s label die cuts. Can you believe I don’t own a single one? Since I am a newbie, I just had to check out their blog. If you are looking for ideas be sure to check out this blog. I can’t wait to get my order!

Just when I thought, I had seen all the flower tutorials, I discovered another great technique video from My Butterfly Kisses. This tutorial demonstrates how to make gorgeous silk lollipops flowers. They are stunning!

Thanks for stopping by and I hope you are having a terrific Thursday. Please stop in tomorrow for a fun blog hop! My first ever!

Linda

Wednesday, April 20, 2011

Easy to Make Fabric and Tissue Tape

I saw an article in the recent Martha Stewart magazine on how to make fabric tape so I decided to give it a try. I modified their technique and also discovered a way to make tissue paper tape. I used this technique to make the fabric tape that you see on this cute box, which I plan to fill with Easter candy.


Please scroll down to watch the video on how to make the fabric tape I used on this box plus how to make tissue tape. In the video, I also demonstrate how to make this quick and easy box using one of my favorite Cricut cartridges.

Monday, April 18, 2011

Happy Spring!

My nephew celebrated his thirtieth birthday, so over the weekend we drove to Missoula for the surprise party. It was so much fun and we actually saw green grass! It is finally starting to look like spring at least in Missoula; it will be a couple of more weeks before we start seeing signs of spring here. Oh well, at least I can be making spring cards.

I am seriously addicted to my new Florals Embellished Cartridge. I love that you can use the images for so many different occasions. This cute card could be used for Easter, Mother’s Day or for a fun birthday card.


I used the bird image located on page 64 of the cartridge. To make the card, I welded two 5 1/2 inch shadow images together. Next I cut all the layers at 5 ½ inches. Lots of layers, but super easy to make.

First, I attached the brown shadow to the base card and then attached the blue layer to the brown piece. Next, I did faux white stitching using my favorite white Uni-ball Signo pen. I attached the remaining layers, added glitter and rhinestones and pop dotted to the brown layer. I love the look, simple, but oh so sweet.

Friday, April 15, 2011

Happy Easter!

Today, I want to share with you my design project for Creative Critterz Imaginations blog.

I just bought the All Wrapped Up Imagine Cartridge and I am seriously loving the bright and fun colors.


For this cute and easycard, I used the card and all the layers located on page 8 of the handbook. Next, I went to the preview page and clicked on fit-on-page to make all the pieces fit on one page. The final size of the card is 4 ¾ x 4 ¼ inches. I wanted a 3-D look, so I trimmed the oval and used Photoshop for the sentiment. I attached the oval directly to my card, pop dotted the frame, added a ribbon and rhinestones and was finished!


One of my favorite features of this cartridge is how easy it is to make matching envelopes. I did a few draft cuts and found that an 8.9 inch envelope fit my card. I kept the other sample envelopes and marked the sizes on each one for future reference. I am going to get a lot of use out of the envelopes on this cart! The envelope is one page 21 and flood filled with paper from page 35 to match my card.

Recipe:
All Wrapped Up Imagine Cartridge
Adhesive and Dimensionals
Ribbon and rhinestones from my stash

Thanks for visiting and have a great week.

Thursday, April 14, 2011

Terrifically Talented Thursday!

Welcome to Terrifically Talented Thursday. For those of you that are new to this blog, every Thursday, I showcase five blogs, websites or posts that I think you will enjoy. Here are my weekly picks.


I love this card by Kristina Werner. It is so simple yet beautiful. Kristina features a card and video every Monday and I try to watch them each week. If you haven’t checked out her Make a Card Monday video series (MACM) you are in for a treat!

I am seriously addicted to DCWV paper and own tons of their amazing card stacks. Their papers are easy to use, perfectly coordinated, can be purchased at Michaels or Jo-Ann Fabrics and you can even use a coupon to get a great deal! DCWV recently published an updated list of all their stacks and I just had to share. Have you ever purchased the same thing twice? I know I have and this will help me organize my paper stacks. Whew!

Kate from Small Bits of Paper recently participated in an Autism Awareness Blog hop and featured an adorable lamb card with a twist. Be sure to stop in for a visit and while you are there you may also want to check out the blog hop.

Yesterday I posted a video on how to make quick and easy zipper flowers. Here is a video by Evange demonstrating a more advanced zipper flower. I love her flower and am going to give it a try.

I can’t wait to order the new Cricut cartridge, Every Day Pop- up cards. In fact, I hope to pick one up at Michaels this weekend. As you probably know, there have been a lot of questions as to how to use this cartridge. I thought I would provide several links that will help you figure it out. Katie has several tutorials on her blog, Crafting with Katie showing how to make the pop-ups and also how to layer them. Be sure to check out Everyday Cricut and Obsessed with Scrapbooking for even more great tutorials. Also Provo Craft just posted photos on the Official Cricut Facebook page. I am so grateful for all the help and can’t wait to get this cart.

Thanks for stopping by and I hope you are having a terrific Thursday. Please stop in tomorrow for a fun new Easter card.

Linda

Wednesday, April 13, 2011

How to Make Quick and Easy Zipper Flowers

I love the look of flowers made out of zippers so I just had to give it a try. They are so cute and super simple to make. You can use regular zippers or purchase zippers by the yard for this fun project.

Please scroll down to see a video on how to make zipper flowers and a quick and easy card.


Monday, April 11, 2011

From the Heart….thanks Monique Griffith

I am a huge fan of Monique’s and just had to scraplift this adorable card that she featured on Everyday Cricut.  It was so cute that I copied the entire card!    I love the country look and feel of this card and Monique has inspired me to try more country cards!  Be sure to click here for her detailed directions and here to visit her blog to see a video on how to add more details to your cards.   I have learned a great deal  from Monique.

Thanks for visiting and stay tuned for a fun new video.

Friday, April 8, 2011

Bo Bunny Meets the Imagine

Today, I want to share with you my design project for Creative Critterz Imaginations blog.

Most of you know Bo Bunny is one of my favorite companies and that I love their card kits. I find it challenging to make masculine cards and Bo Bunny makes it so easy with their new Timepiece Card Kit.

Since the card was so easy to make, I thought I would use the Imagine to decorate the inside of my card and the envelope. I really did feel guilty making a kit card, but I quickly got over it!


For the envelope I cut the image on page 31. Then, of course, I used pop dots to add dimension. I seem to go through a lot more pop dots using the Imagine, but I love the look!


For the inside of the card and envelope, I used the Imagine More cartridge. This cartridge has so many images that go perfectly with the Timepiece Collection.

First I traced the bottom of the card and covered it with brown card stock and added a ribbon.

Next, I cut the image on page 17, only using the first layer and flood filled it with paper from page 42. Your size will depend on the size of your card. This image was cut at 3 inches.

I used Photoshop to create the text and printed directly on the shape. I love this shape and plan to use it to make a card. There are so many fun shapes on the Imagine cartridges. I used pop dots to give it extra dimension and I was finished with the inside.

Recipe:
Imagine More Cartridge
Bo Bunny Timepiece Card Kit
Brown card stock for the inside of the card
Ribbon from my stash
Adhesive and Dimensionals

Thanks for visiting and have a great week.

Thursday, April 7, 2011

Terrifically Talented Thursday

Welcome to Terrifically Talented Thursday. For those of you that are new to this blog, every Thursday, I showcase five blogs, websites or posts that I think you will enjoy. This week’s theme is Easter and I have a couple of fun Easter blog hops to share with you. Hope you enjoy my weekly picks.


Samantha Casey is a super talented crafter and I could not stop smiling when I saw her adorable Easter cards. Be sure to scroll down to see all her cute designs. I promise you will love her blog.

CARDZ TV is a must see blog for card videos. I have learned a great deal from Mary so be sure and stop in for a visit and see her cute Easter card videos. I am so behind on my Easter cards, but ahead on Mother’s Day. Yikes!

September Ninth is another one of my favorite blogs and has a number of fun Easter projects that you will love. Ruthie made the cutest Easter purse using an SVG file and Birthday Bash. So adorable!

If you love Disney, you will want to visit Bitten by the Bug 2  Disney blog hop. Oh my goodness, it is so amazing to see all the talented Disney fans. Keep scrolling as you do not want to miss a single one of them.

Last, but certainly not least is the news from Two Peas in a Bucket. They are expanding into more stamping and card making. To kick off the event, they are celebrating "30 Days of Stamping & Card Making" in the Classes & Events section. New content, challenges, prizes and special guests are just a part of the event. Wow!

Thanks for stopping by and I hope you are having a terrific Thursday. Please stop in tomorrow for a fun new card.

Linda

Wednesday, April 6, 2011

Twine Embellishments

In the February Issue of Creating Keepsakes, I saw these twine blooms and I fell in love with them. I modified their technique and had to share. In fact, I made one to decorate my business card holder that I made. If you want to watch the business card holder video, please click here.

Thanks for visiting and stay tuned for a fun Terrifically Talented Thursday.

Linda

Monday, April 4, 2011

Easter Egg Card and Video

We have been having so much fun traveling over the past week that I have been neglecting my craft room. We made another trip to Yellowstone, but this time it was planned. Since I was gone most of the week, I thought I would share my Easter Card from last year. But first, a couple of new photos from Yellowstone Park.


Mammoth Hot Springs Terraces


Two Elk hoping for an early Spring.


I am back in my craft room so I will have a new video to share with you on Wednesday! Thanks for visiting and have a wonderful week!

Friday, April 1, 2011

Happy Mother’s Day Card

I am getting a head start on Mother’s Day! Can you believe it?


For this cute and easy card I used the Best Friends Imagine cartridge.

First, I flood filled a 5 x 5 inch square (page 37) and punched it using a Martha Stewart Double Loop Punch Around the Page set.

Then, I used the Imagine Best Friends cartridge to cut the chair on page 24. I cut the entire image at 4 inches and then layered just the chair with pop dots.

Next I folded a 4 3/8 x 4 3/8 inch piece of card stock for the base and rounded the corners. I attached the card base to the punched image leaving a row of loops showing.


I used Photoshop to print the 3/8 x 1-1/8 inch outside sentiment. The inside sentiment measures 3 -7/8 x 3- 7/8 inches and was also done using Photoshop.

This cute card could be modified to use as a birthday card or even as a get well card. Just change the sentiment and you are ready to send.

Recipe:
Best Friend’s Garden Imagine cartridge
Card stock for card base and inside and outside sentiment
Adhesive and Dimensionals
Thanks for visiting and have a great week.

Total Pageviews

 
--------- ----------