Monday, April 30, 2012

All things Twine

Recently I saw an article in Scrapbooks Etc about making amazing twine cupcakes so I decided to do a two part video on All Things Twine.


I had so much fun making these cupcakes and I learned a few simple tricks when working with twine that I will cover in my first video. In fact, I also discovered a couple of new products that I can’t wait to share with you. I couldn’t wait to show you the projects, but I have not had a chance to film my video series. Hopefully I will have the first video available this Wednesday.


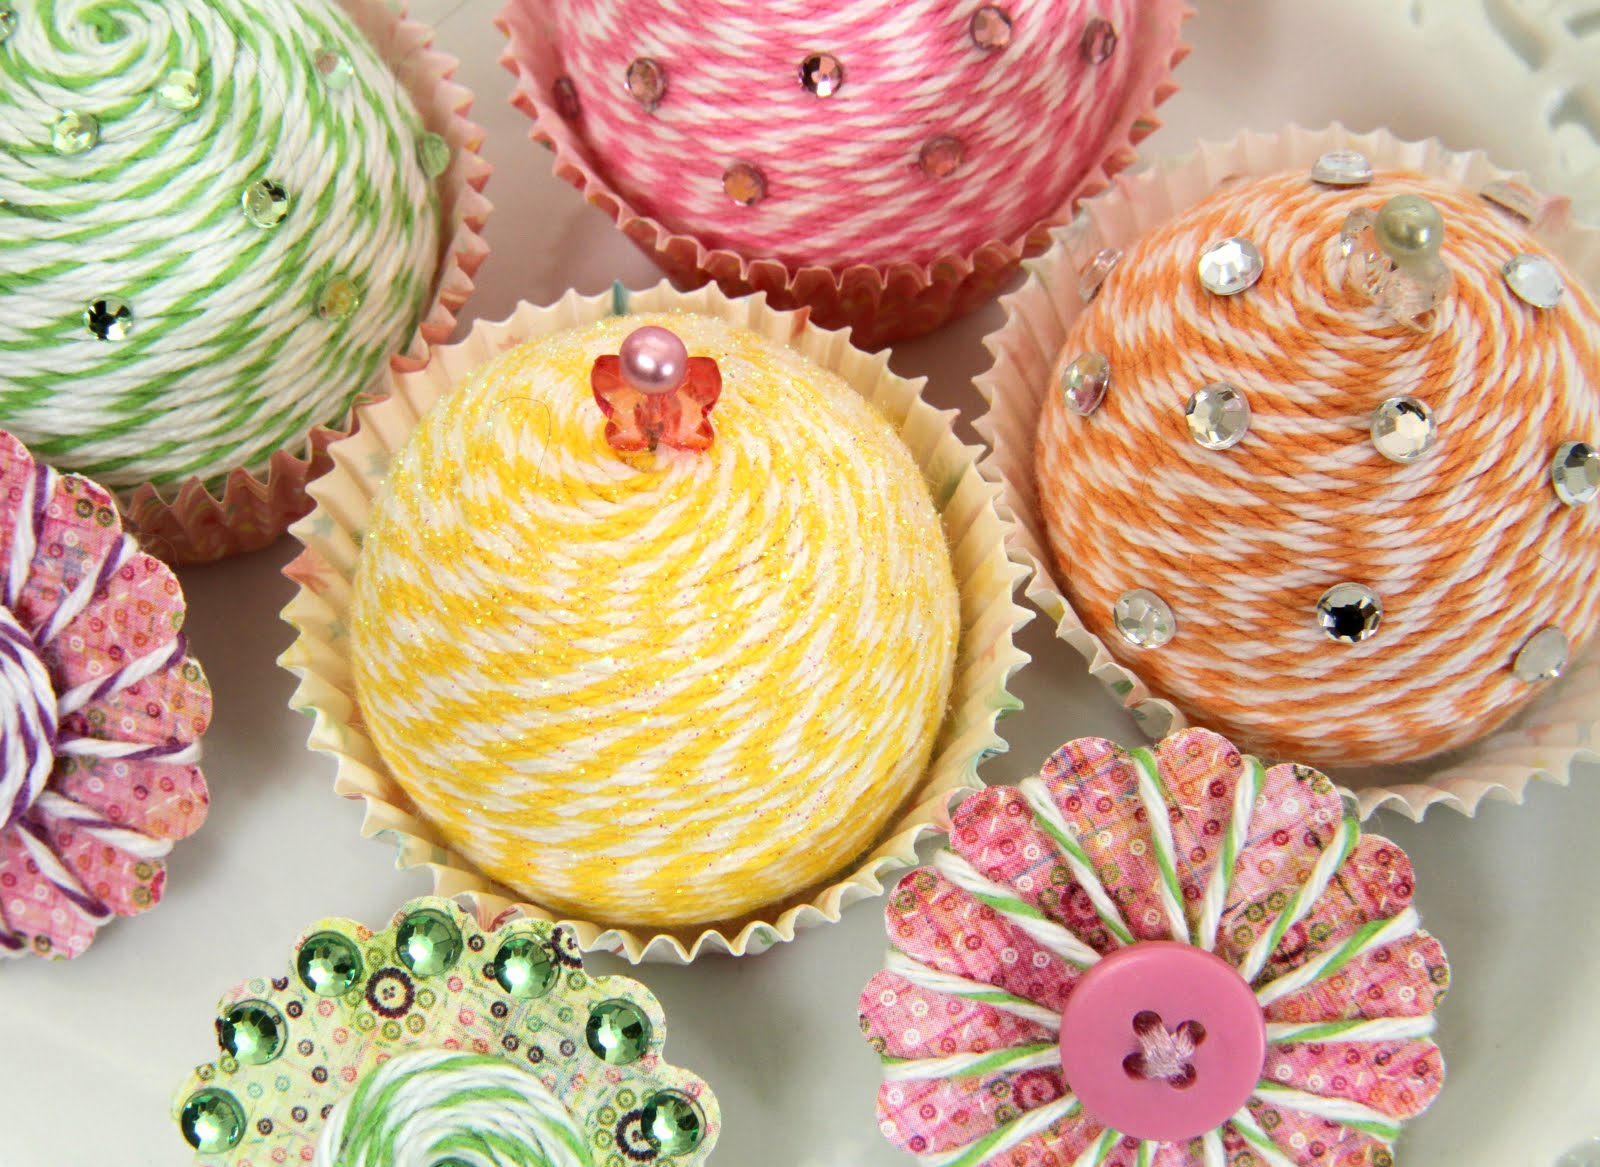
I love these cupcakes.


Making embellishments with twine is fun and I also have a few tips to make it super easy. I even made the pedestal which I will also show you in the video. Think how cute these embellishments would be using a Cricut cut.


While working on this post, I came up with the idea of twine earrings and how to make a quick and easy earring stand. I love the look of these and plan to make several more pairs. Can you say addicting and inexpensive?


These earrings are not made using paper and both sides look good. Here is a photo of the back. I will show you how to make these and the quick stand in the series.

Thanks for visiting and stay tuned for the videos!

Linda

Friday, April 27, 2012

Fab Five Friday Frugal Fun!

Welcome to Fab Five Friday….Frugal style! Today’s theme is on saving money and upcycling and I have several Fab Five Friday Frugal items that I think you will enjoy.

Also, I mixed it up a little this week and added a Thursday post. Be sure to scroll down to see my office companion post. I love my new bulletin board and so hope you do too! Let’s get started!


What is more economical and fun than making your own earrings out of paper? These earring designed by Steph, from Crafting in the Rain are too cute! Be sure to check out her tutorial for all the details. You can make these using any type of cutting machine or using punches. I see Cricut earrings in my future!

Speaking of Fab Five Friday Frugal Fun, check out the Fancy Frugal Life’s blog. Lina has so many beautiful upcycled items that you just have to see. Her daughter’s shabby chic glam room is remarkable!

I discovered the blog, Fake it Frugal when I was looking for a recipe on how to make Windex. Heather also has recipes for making Febreeze, Clorox Clean-Up and Bisquick. Grab a cup of coffee or cocoa and enjoy her blog! I promise it will save your money!

If you are looking for a new way to use your embossing folders, click here to see a video on embossed kisses. Beate has come up with another great idea to get more use out of your crafting supplies, thus saving you money!!

Thanks to my sister, I have another cost saving tip. Click here to see how to make your own ink dabbers courtesy of The Happy Card Encouragement Factory. Wow! I am so going to ask my husband to help make these. Hint Hint!

Thanks for stopping by and I hope you are having a fun filled Frugal Fab Friday!

Thursday, April 26, 2012

Office Companions Made Entirely Out of Paper

I fell in love with Patricia Zapata Office Companions set and just had to buy it. This set is so versatile and can be sized to fit any office or craft room. Click here to order the complete SVG and DXF set from A Little Hut. There are two videos to help you with the assembly, so be sure to visit her YouTube channel to see them.


I covered a bulletin board with card stock so I would have a perfect place to show off my new hanging files. I used the Out of Print collection from BasicGrey for all my designs. Did I mention that I love BasicGrey paper?


I used a large punch for the lattice strip and the stickers were part of the collection. I love this hanging file and plan to make a few larger ones for my craft room. They remind me of the new Martha Stewart hanging files. You can hang them on your walls with Scotch Removable Clear Mounting Squares.


This hanging file has room for a picture, a paper pad and pencil. Each file has holes in them so you can hang them on a bulletin board, but I am going to remove the holes and put magnets on the back of this one so I can hang it on my refrigerator. I so need to add a photo!


I also made the tacks that are shown in this photo. I cut small circles with my Cameo and then glued them to the top of flat tacks. I love the way they blend into the design.


I sized this file so I could use it to store my business cards. I made it a little larger than my standard cards so I could also use it for some of the oversized business cards that I made. The fun thing about these files is that you can size them to fit your needs.


Lastly, this wonderful kit comes with a desk note holder that was so fun to put together. Whew…this was a long post. Hope you are still with me!

Thanks for visiting and stay tuned for a fun Fab Five Friday! Next Wednesday, I will be back with a two part video series on (it is a surprise) so stay tuned to find out more! All will be revealed on Monday!

Wednesday, April 25, 2012

The Winner is……….

Thanks to everyone for entering the Impress Stamps and Ink Giveway! I was overwhelmed with the responses! Now for the drum roll…. And the winner is…..

LuvMyCricut said... I would so love to win those stamps. I look forward to your emails each day to see what creative thing you have made. You truly inspire me. Lynn

Congrats Lynn Please email your address to lkaisermt@gmail.com so we can send you your stamps and ink pads. Remember you have two weeks to claim your prize.

Also please join me in thanking Ann Zazzi owner of Impress Rubber Stamps for sponsoring an amazing giveaway. If you have a chance to visit Impress Rubber Stamps, I promise you will love their store. In addition to making their own rubber stamps, they now make their own pigment inks called Fresh Ink and they are gorgeous. There are over 40 colors to choose from!

You can click here to buy on-line and you can also download a color chart of their amazing ink. Yahoo! Also be sure to like their Facebook page! Thanks again Ann!!

Be sure to stop back on Thursday for a fun new project….hint it involves organizing your space!

Monday, April 23, 2012

Three Drawer Chest of Drawers Made Entirely Out of Paper

Before we get started, don’t forget to sign up for the mega stamp and ink giveaway sponsored by Impress Stamps. Click here to enter.

When I made the paper shadow box (click here to see) that I posted last Monday, I thought I needed a little practice with the concept so I made this chest of drawers. When I am first designing a project, I like to cut the 3 D file using inexpensive white paper. It turned out that the shadow box instructions were so easy that I didn’t need to practice on this file. Also, this three drawer file was so easy to put together that I did not need to do a test project. In fact, it turned out so cute that I decided to decorate it and use it for an upcoming baby shower gift. Next time, I will make it using decorative papers!


After I assembled the chest of drawers, I covered the chest with paper from my stash. This gift is designed to go in the baby’s room, but I just couldn’t resist filling it with gifts for the mom to be. I found these cute little polishes and lip gloss at Sally’s that I will put in the drawers, but first, I want you all to see how cute they are! I plan to fill the rest of the drawers with cute wrapped candy. Looks like I have some shopping to do!


I thought it would be cute to add a homemade frame, so the mother to be could include a photo.


I also used some left over stickers on the front of the drawers. I love how cute they are!!

Lori Whitlock designed this amazing file and you can purchase the SVG file here or from the Silhouette On-line store. I used my Cameo to cut this file. Speaking of Lori Whitlock, she left me the nicest comment on my shadow box post. I am a huge fan and her comment meant so much to me. In case you missed it, here it is.

Linda, you did an outstanding job on this shadow box. It made my day to see that you used both my cutting file and my paper! You are truly amazing. This turned out adorable!

Thanks for visiting and stayed tuned for a fun Wednesday post!!

Friday, April 20, 2012

Fab Five Friday!

Welcome to Fab Five Friday! For those of you that are new to this blog, every Friday I showcase five blogs, websites or posts that I think you will enjoy. Before we get started, don’t forget to sign up for the mega stamp and ink giveaway sponsored by Impress Stamps. Click here to enter.


Last week, I had the opportunity to see Renee on the Martha Stewart show and I could literally not wait to share her amazing creations with you. I am in love with her diaper cakes and adorable creations made using baby washcloths. Her peapod and carrots are too cute. And the washcloth heart and roses cake is too! Click here to visit her Etsy store, where you can purchase  directions for her adorable creations. Her topsy turvey cakes are also amazing!!

I learned so much from Keri Bradford’s beginning Silhouette class that I am  planning to take her second class, Silhouette: Oh the Places You’ll Go. This is an immediate class and I know you will love it. Click here to see a class description and sign up.

If you have not visited Split Coast stampers, you will want to check out their informative website. Warning, you can spend hours looking at all the fun projects and tutorials. Click here to check out the most recent tutorial on how to create a gorgeous faux patina using stamps. It is beautiful!!

Pink Paislee is a favorite of mine and I hope you will like it too. Not only are their papers and products stunningly beautiful, their blog is packed with great ideas for scrapbooking and card making. You will leave their site inspired to create stunning pages and projects. Enjoy!!

This is one of my favorite tutorials for using Spellbinder dies ever! It has been around for about a year but so worth revisiting! This tutorial by Beate demonstrates how to emboss only the outer edges of your card stock, leaving the innermost part smooth to stamp on. Be sure to scroll down for instructions on how to make a make a frame using your nestabilities.

Thanks for stopping by and I hope you are having a fun filled Fab Friday! Please click here to sign up for the amazing stamp and ink giveaway sponsored by Impressed Rubber Stamps. Thanks Ann for sponsoring this amazing giveaway!

Wednesday, April 18, 2012

Impress Stamps and Ink Giveaway!!

Ann Zazzi owner of Impress Rubber Stamps is sponsoring an amazing giveaway and I am so excited and honored! Thanks to Ann, I am giving away seven gorgeous wood mounted rubber stamps and three beautiful ink pads.


The winner will receive the following stamps: graphic mum with small flower, small graphic mum w/ flower, blooming stem, organic stem, simple stem and the adorable butterfly.

These stamps are from their new spring line and they are beautiful!! Ann used all the stamps on the cover of their new catalog that is shown above. Wow!

In addition, the winner will receive three Fresh Ink pads, a capri, ginger and a grass one made exclusively for Impress Stamps. Thanks again Ann for sponsoring this generous giveaway!

To enter, you need to be a subscriber/follower of my blog and leave a comment on this post. You can sign up over on the left side of this blog (if you are not there already).

For two chances to win, please join my FB page, by clicking here and leave an additional comment on this post that you liked my page. The giveaway closes at midnight MDT on Tuesday April 24th. The winner will be picked at random using the random number generator and will be announced on Wednesday April 25th.

If you have a chance to visit Impress Rubber Stamps, I promise you will love their store. In addition to making their own rubber stamps, they now make their own pigment inks called Fresh Ink and they are gorgeous. There are over 40 colors to choose from!

You can click here to buy on-line and you can also download a color chart of their amazing ink. Yahoo! Also be sure to like their Facebook page!

Linda

Monday, April 16, 2012

Shadow Box Made Entirely Out of Paper

I am proud to say that I made this shadow box entirely out of paper thanks to a wonderful SVG file designed by Lori Whitlock. Lori created this amazing 8 x 10 shadow box file that you can purchase here. She also created an 11.3 x 11.3 size that I also ordered. I cannot say enough about Lori’s amazing talents! I ordered my files through the Silhouette Store, but you can order the SVG file directly from Lori’s website.

Lori also has a video tutorial on how to put this shadow box together. It is a fairly complicated project, but Lori’s assembly instructions are easy to follow. I used my Silhouette Cameo to cut the file.


I made this shadow box using papers from the This and That Grateful Collection that Lori designed for Echo Park. The solid paper is from Bazzill. Lori not only designs beautiful paper collections and fabrics, she also creates the most adorable SVG files!


I used stickers from her collection to decorate the inside of my shadow box. Needless to say, I used a ton of dimensionals to get the 3-D effect. Her papers coordinate so nicely that it made the decorating part easy! Once you assemble the shadow box, the fun begins!!


I am giving this to a friend and wanted to include a photo holder, but I could not find one to fit, so I made my own. I used a binder clip to make this cute holder and included a frame (sticker) so she could insert a photo that she likes. I also left one compartment empty so could decorate it to fit her decor.

Thanks for visiting and be sure to stop back Wednesday for a mega surprise!!

Linda

Friday, April 13, 2012

Fab Five Friday!

Welcome to Fab Five Friday! For those of you that are new to this blog, every Friday I showcase five blogs, websites or posts that I think you will enjoy.


Today I have a special treat for all of you. Nadia, from With Glittering Eyes did an extensive interview with Jayne McGowan, a mega talented paper artist and the creator of this amazing piece. To read the interview and see more than 11 pieces of Jayne’s amazing art plus two videos, click here.

To visit Jayne’s breathtaking blog, click here and to view her website click here. A special thanks to both Jayne and Nadia for allowing me to showcase their many talents. Grab a cup of coffee or cocoa because you will spend hours looking at both of their blogs! I promise!

There are lots of videos on making rosettes with paper punches, but this one from ScrappinThread.blogspot.com is so nicely done that you just have to see it! Click here to see Beverly’s blog post too! Also visit her YouTube channel for even more tutorials on making rosettes.

Not only am I passionate about crafting, I am passionate about food. Currently I am trying to eat a more healthy diet and am in love with salads. For lots of amazing recipes, be sure to visit Salad in a Jar. Paula’s recipes are yummy and click here to see how to make salad in a jar that lasts over a week. I just finished her video on which vacuum pack machine to buy and I am going to order the $20.00 hand held version plus the adapter. I also make homemade yogurt and yogurt cheese and love her section on yogurt. Yummo!

I saw this next video on Pinterest, thanks to my sister, and just had to share. Jennifer McGuire demonstrates a fun stamping technique using a mask for a reverse look. I so enjoyed this technique. Speaking of Pinterest, I would love to invite you to follow me on Pinterest by clicking here.

If you follow my blog, then you know I am a little obsessed when it comes to Mod Podge and recently did a video on several techniques that you can do with it. Click here to see my video. When doing research for my video I discovered the official Mod Podge Rocks website and love it. Click here to see lots of projects using Mod Podge.

Thanks for stopping by and I hope you are having a fun filled Fab Friday. Stay tuned for a fun and exciting week. Thanks to a generous sponsor, I am having an amazing giveaway!!

Linda

Wednesday, April 11, 2012

Martha Stewart Fringe Scissors Review and Techniques

On today’s video I am reviewing the Martha Stewart Fringe Scissors and I will also demonstrate a couple of easy techniques. Please scroll down to see the video.

Martha Stewart’s Fringe Scissors have been around for quite some time and I have to admit, I was very skeptical as to how they would work or if I would ever use them. Usually I like to be an early adopter of new products, but not in this case. Well it turns out that I was sooo wrong. I love these scissors and wish that I had purchased them when they first became available. Oh well, as my mother would say, better late than never!

I purchased mine at Jo-Anns using a 40 percent off coupon. They sell for $14.99 on-line at Joanns.com and you can also buy a pair at Michaels. With coupons you can get them for around $7.50. Not bad for a good pair of scissors. My only regret is that I did not have them in time for Easter!!


Enjoy the video and have a great day!

Linda

Monday, April 9, 2012

Cupcake Pedestal or 3-D Table

I fell in love with this free SVG file and just had to share. I love all of the Cricut cupcake holders and did a happy dance when I found this free SVG file for a cupcake pedestal. I cut this file using the Silhouette Studio Designer Edition and my new Cameo. I love having my Cricuts and the Cameo and now have tons of flexibility! Click here to get the free file designed by Images by Heather.


The yummy cupcakes are from our local Safeway store. I cut the base twice and glued the pieces together for added stability.

Thanks for visiting and please stay tuned for a fun tool and technique video.

Friday, April 6, 2012

Fab Five Friday!

Welcome to Fab Five Friday! For those of you that are new to this blog, every Friday I showcase five blogs, websites or posts that I think you will enjoy.


My newest obsession is Echo Park paper and their This and That line by Lori Whitlock. Click here to download a free 29 page booklet that contains 4 layouts , 4 cards and 2 gorgeous mini albums featuring the Graceful and Charming This and That Collections. Did I mention this is a free download? If you like Echo Park, then you are going to love their blog. And if you can’t wait to get this paper, click here to buy Echo Park Paper in a digital format. Be sure to scroll down to see the This and That collections. I am currently working on an adorable project using the Charming collection.

Love and Rosen featured a DIY Cocktail made out of vintage earrings and I can’t wait to make one. This technique is so worth a try and it looks so easy! My kind of project.

Mod Paperie is a paper crafting blog that I know you will enjoy. Grab a cup of coffee or cocoa and spend some time looking at Thienly Azim’s beautiful blog.

If you are looking for delicious low fat recipes, you will want to visit SkinnyTaste. My favorite is Gina’s recipe for Pineapple Bliss Cupcakes. Only 93 calories!

I recently discovered Landee See Landee Do and love her diverse projects. Her home décor projects are adorable and her Easter mantel is so clever!

Thanks for stopping by and I hope you are having a fun filled Fab Friday and a Happy Easter weekend!

Linda

Wednesday, April 4, 2012

How to Turn a Cricut Purse or Any 3-D Purse into an Accordion Purse

One of my favorite Cricut cartridges is Tags, Bags, Boxes, and More and one of the reasons I love it so much is that I think the purses are adorable. I have made tons of purses from that cartridge and decided it would be fun to turn them into accordion purses. You are going to love this easy technique!


This technique will work on any 3D purse and it is so easy!! Please scroll down to watch the video.


Thanks for visiting and please stay tuned for a fun Fab Five Friday!

Monday, April 2, 2012

Bunny Bag Topper

This adorable Easter bag topper is something both children and adults will love. My favorite part is that it is so easy to make!


I cut the file and all layers, using a variety of card stock from my stash. The topper piece was originally one layer, but using the Cameo software, I quickly made an inside (pink polka dot) layer. With the Cameo and the included software, you can quickly make a shadow (offset) layer for any image and you can also make an internal layer (internal offset) of any image. I added faux stitching and was done! So easy!

I purchased this file for $.99 and you can order it here.

Thanks for visiting and please stay tuned for a new video…hint it involves modifying Cricut cuts to make a fun project. You will love it!!

Total Pageviews

 
--------- ----------